---
title: "Frequently Asked Questions (FAQ)"
slug: "powerroster-faqs"
updated: 2026-06-25T03:48:34Z
published: 2026-06-25T03:48:34Z
canonical: "docs.powerworker.com/powerroster-faqs"
---
> ## Documentation Index
> Fetch the complete documentation index at: https://docs.powerworker.com/llms.txt
> Use this file to discover all available pages before exploring further.
# Frequently Asked Questions (FAQ)
---
###
#### What is PowerRoster?
PowerRoster is a cloud-based workforce management solution that seamlessly empowers front-line workers and enhances efficiency.
Automate workforce allocation and scheduling with precision by extending Microsoft Dynamics 365. From efficient rostering to real-time updates, PowerRoster simplifies workforce management, providing a comprehensive solution based on the robust Microsoft Power Platform. Drive better business results by optimising workforce utilisation and ensuring accurate scheduling anytime, anywhere.
#### What is Roster?
A roster, also known as a schedule or timetable, is a plan that outlines the specific times and dates when individuals are assigned to work or perform certain tasks.
#### How do I get started?
1. Follow the link: [https://appsource.microsoft.com/en-us/marketplace/apps](https://appsource.microsoft.com/en-us/marketplace/apps)
2. Search for PowerRoster and select the version.
3. Navigate to the **PowerRoster** version.
4. Select **Buy Now**.
5. The Power Platform Admin Centre will open for user authentication. Please fill in the required information to complete the purchase.
6. Assign the PowerRoster License.
7. Assign the user and select **Install this product**.
8. Select the Power Platform or D365 environment where you want PowerRoster installed.
PowerRoster will be installed in your solution. Refresh to check the installation status.
Once the PowerRoster is installed, navigate to the environment in which you selected to access PowerRoster app.
#### How to find RPIs?
Roster Position Instances (RPI) will not be generated until:
1. The **Roster Pattern** is determined.
2. The "**Days in Advance**" field is correctly configured.
#### What License do I need to access the PowerRoster Frontline App?
You need a **PowerApps license** to access PowerRoster.
#### How do I set up a Day off in Roster Patterns?
1. In the pattern builder, **+Add Blank Pattern Day** and select the Calendar icon to Edit the Pattern Day 1.
2. Select **Not Working Day** field.
3. Check **Start** and **End Time**. If scheduling 24 hours for the RDO, make sure the End Time is set to ‘Next Day’ and Save.
#### How to add a Shift that continues beyond Midnight?
1. In the pattern builder, **+Add Blank Pattern Day** and select the Calendar icon to Edit the Pattern Day.
2. Fill in the **Start Time** and **End Time** as Next Day.
3. Save.
#### How can I find more information regarding Bookable Resources?
Visit: [https://learn.microsoft.com/en-us/dynamics365/field-service/set-up-bookable-resources](https://learn.microsoft.com/en-us/dynamics365/field-service/set-up-bookable-resources)
#### How to add additional Shifts?
Individual shifts can be added to a Roster to allow for flexibility as required.
1. Navigate to PowerRoster App > Rosters > Calendar.
2. Hover over the required date and click + icon then select **+Add this Shift**
3. Fill in the required fields and click **Save**
#### Roster Settings Panel is blank
Likely causes:
1. The setting to allow publishing of canvas apps with code components is disabled.
2. The Roster Settings custom page was not published during the installation.
To resolve:
1. Enable publishing of canvas apps with code components:
1. Go to Admin Center > Target Environment > Settings > Product > Features.
2. Toggle **Allow publishing of canvas apps with code component** to On.
2. Publish the Roster Settings Custom page:
1. Go to **Default Solution > Pages > Roster Settings**.
2. Make a small change (e.g., update a tooltip), click Save, then Publish.
#### Health Checker Page Not Loading Properly
Likely causes:
1. The setting to allow publishing of canvas apps with code components is disabled.
2. The Roster Settings custom page was not published during the installation.
To resolve:
1. Enable publishing of canvas apps with code components:
1. Go to Admin Center > Target Environment > Settings > Product > Features.
2. Toggle **Allow publishing of canvas apps with code component** to On.
2. Publish the Roster Settings Custom page:
1. Go to **Default Solution > Pages > Roster Settings**.
2. Make a small change (e.g., update a tooltip), click Save, then Publish.
#### What is PowerRoster™ Accreditation Program?
The PowerRoster™ Accreditation Program is a structured certification pathway developed by Velrada to recognise and build expertise in workforce management. Tailored to each client’s operational needs, it offers role-based tiers that ensure every part of the business – from day-to-day users to technical specialists – is empowered to get the most from PowerRoster™. Participants earn LinkedIn-ready badges and internal recognition while boosting confidence, compliance, and adoption.
**Certification Tiers**
**PowerRoster™ Advocate**
Champions adoption and everyday use. Advocates demonstrate operational expertise, promote rostering best practices, support colleagues, and drive team engagement.
**PowerRoster™ Technical**
For technical specialists skilled in implementation, configuration, and extension. They understand architecture, integration, compliance logic, and optimisation workflows to support scalable deployments.
**PowerRoster™ Administrator**
System owners who maintain scheduling rules, manage user access, troubleshoot rostering issues, and align the platform with evolving business needs.
#### **How can I display notes or comments on Availability records within the roster?**
To display the comments text directly:
{{CustomFields.availabilitycomments.value}}
To conditionally show/hide components only if a comment exists, wrap them in:
- {{#CustomFields.availabilitycomments.value}}
- {{/CustomFields.availabilitycomments.value}}
**Configuration Steps**
| **App Setting** | **Configuration** | **Notes** |
| --- | --- | --- |
| Roster/RosterPCF/CustomFields | { "name": "availabilitycomments", "type": "string", "label": "Availability Comments", "allowGrouping": false } | Add this to the existing JSON configuration alongside any other elements already present. |
| Roster/RosterPCF/ExternalShiftFetchXml | | Add this linked entity to the FetchXML for vel_rosterpositioninstance |
| Roster/RosterPCF/ShiftDisplayTemplates | { "default": "{{#shiftDescription}}📄{{/shiftDescription}}{{fromDateTimeString}} - {{toDateTimeString}}
{{shift}}
{{shiftType}}
", "external": "{{#CustomFields.availabilitycomments.value}}📄{{/CustomFields.availabilitycomments.value}} {{Roster.Name}}
{{fromDateTimeString}} - {{toDateTimeString}}
{{shift}}
{{shiftType}}
" } | You may access the comments text with {{CustomFields.availabilitycomments.value}} You may conditionally show/hide components on the template with these tags. (If true/not null then the scope will be executed) {{#CustomFields.availabilitycomments.value}} {{/CustomFields.availabilitycomments.value}} |
****How can I renew or update my existing PowerRoster license?****
The process for renewing or updating your PowerRoster license depends on the version you are currently using.
1. **PowerRoster versions earlier than v8.0**
The system will automatically update the Expiry Date on the Subscription record.
1. Navigate to “Contact us” page and send us request to renew your license. Please add your “Organisation Id” in the description.
2. Velrada team will respond via email with Hash and License key details.
3. Navigate to your PowerRoster instance under Setting → Configuration → Subscriptions.
4. Open active Subscription record and update the Hash and License on the record.
2. **PowerRoster v8.0 and later**
The system will automatically update the Expiry Date on the Subscription record. You can see the updated Expiry Date in the Health Check section.
1. Navigate to your PowerRoster instance under Setting → Analytics → Health Check.
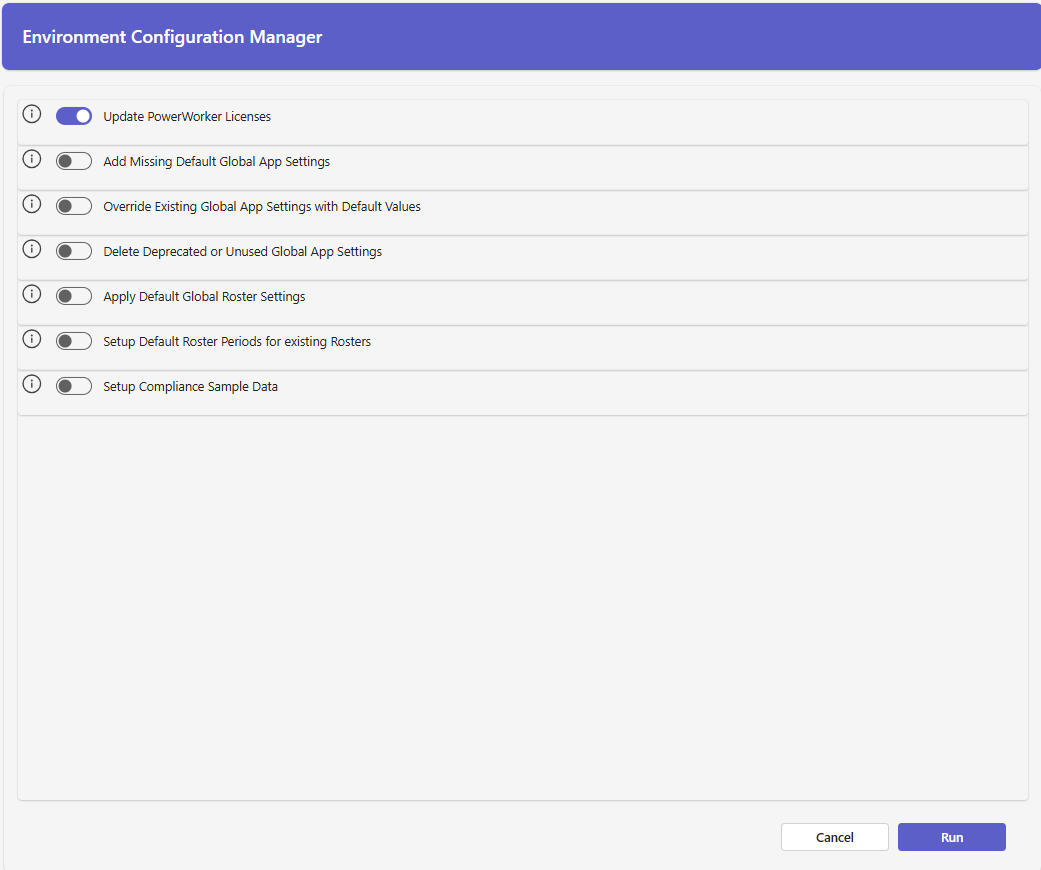
2. Click on “Open Environment Configuration Manager”.
3. Mark “Update PowerWorker Licenses” as “Yes”.
4. Click on “Run”.